
Notes
- This pattern is written in US crochet terms (see here for UK version)
- Video tutorial available
- I’d recommend this pattern for beginner to intermediate crocheters. I’ve written this pattern with step by step instructions with the intention that beginners could complete it. It does include some techniques that are more advanced, eg the foundation single crochet stitch, but there are alternative stitches suggested for beginners.
- You can add the pattern to your Ravelry queue here
- A print friendly version of this pattern is available to purchase from my Etsy store here for $1.99 AUD. Your purchase helps support my work as a designer. The pdf includes a 9 page photo tutorial, plus a 2 page version of the pattern without photos – this is handy to refer to once you’ve made the pattern a couple of times and don’t need the photos.
Materials:
- 260-300 m (120-200 g) of 8-10 ply cotton [285-330 yards, 4.2-7 oz]. I used 290 m/175 g of Industrial Yarns 1.5 mm cotton
- 5 mm/H crochet hook (or size required to get the gauge)
- Yarn needle, scissors, tape measure
Finished Size:
- Width at opening – 46 cm (18 in)
- Length (not including straps) – 35 cm (14 in)
- Straps – 40 x 2 cm (16 x ¾ in)
Gauge:
Although the gauge is not critical for a bag, if your tension is very different to mine your bag may end up a lot smaller or bigger (which could cause you to run out of yarn), so this is here for your reference,. Note that the gauge was measured on the finished bag without stretching.
- On the netting – (3 Tr, ch 3)x2 = 8 cm; 4 rows = 10 cm
- On the straps – 16 SC = 10 cm
Stitches
- Ch = chain
- Sl st = slip stitch
- SC = single crochet (UK double crochet)
- SC2tog = single crochet two together
- FSC = Foundation single crochet video tutorial
- TR = treble (or triple) crochet (UK double treble)
- st(s) = stitch(es)
Pattern
- This is worked from the centre out to form a square. Opposite ends of the square are gathered in, then the 2 remaining sides and the handles are worked in a single loop.
- NB the starting ch 3 counts as the first TR
- video tutorial also available:
Foundation: ch 10, join with sl st to form a circle (NB if you chain loosely, used ch 8 here)
Row 1: Ch 6 (counts as first TR + ch 3), (2 TR into the circle, ch 3)x7, TR into the circle, join with sl st to the 3rd ch of starting ch 6, sl st across to the ch 3 space [8 repeats of *2 TR, ch 3*, total 16 TRs]
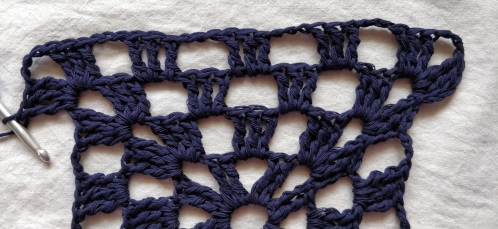
Row 2: Ch 3, 2 TR into ch 3 space, ch 3, 3 TR into same ch 3 space, *ch 3, skip 2 sts, 3 TR in next ch 3 space, ch 3, (3 TR, ch 3, 3 TR) in next ch 3 space* repeat x3, ch 3, skip 2 sts, 3 TR in next ch 3 space, ch 3, sl st to top of starting ch 3 (left photo below), sl st across 3 sts to end in the ch 3 space (right photo below) [each side 3 repeats of *3 TR, ch 3*; total 12 repeats or 36 TRs]


Row 3: Ch 3, 2 TR into ch 3 space, ch 3, 3 TR into same ch 3 space, *(ch 3, 3 TR in next ch 3 space)x2, ch 3, (3 TR, ch 3, 3 TR) in next ch 3 space* repeat x3, (ch 3, 3 TR in next ch 3 space)x2, ch 3, sl st to top of starting ch 3, sl st across 3 sts to end in the ch 3 space [each side 4 repeats of *3 TR, ch 3*; total 16 repeats or 48 TRs]
End of row three (~15 cm/6 inches across):

For rows 4-13 you will be repeating the same pattern with an increase.
Starting each row: ch 3, 2 TR in the ch 3 space (top left); ch 3, 3 TR in the same ch 3 space (top centre); ch 3, 3 TR in the next ch space (top right); keep working *ch3, 3 TR* repeats making 2 x 3 TRs in the corners (bottom). Finish each row as shown above, under row 2.


Row 4: Ch 3, 2 TR into ch 3 space, ch 3, 3 TR into same ch 3 space, *(ch 3, 3 TR in next ch 3 space)x3, ch 3, (3 TR, ch 3, 3 TR) in next ch 3 space* repeat x3, (ch 3, 3 TR in next ch 3 space)x3, ch 3, sl st to top of starting ch 3, sl st across 3 sts to end in the ch 3 space [each side 5 repeats of *3 TR, ch 3*; total 20 repeats or 60 TRs]
Row 5: Ch 3, 2 TR into ch 3 space, ch 3, 3 TR into same ch 3 space, *(ch 3, 3 TR in next ch 3 space)x4, ch 3, (3 TR, ch 3, 3 TR) in next ch 3 space* repeat x3, (ch 3, 3 TR in next ch 3 space)x4, ch 3, sl st to top of starting ch 3, sl st across 3 sts to end in the ch 3 space [each side 6 repeats of *3 TR, ch 3*; total 24 repeats or 72 TRs]
Row 6: Ch 3, 2 TR into ch 3 space, ch 3, 3 TR into same ch 3 space, *(ch 3, 3 TR in next ch 3 space)x5, ch 3, (3 TR, ch 3, 3 TR) in next ch 3 space* repeat x3, (ch 3, 3 TR in next ch 3 space)x5, ch 3, sl st to top of starting ch 3, sl st across 3 sts to end in the ch 3 space [each side 7 repeats of *3 TR, ch 3*; total 28 repeats or 84 TRs]
Row 7: Ch 3, 2 TR into ch 3 space, ch 3, 3 TR into same ch 3 space, *(ch 3, 3 TR in next ch 3 space)x6, ch 3, (3 TR, ch 3, 3 TR) in next ch 3 space* repeat x3, (ch 3, 3 TR in next ch 3 space)x6, ch 3, sl st to top of starting ch 3, sl st across 3 sts to end in the ch 3 space [each side 8 repeats of *3 TR, ch 3*; total 32 repeats or 96 TRs]
Row 8: Ch 3, 2 TR into ch 3 space, ch 3, 3 TR into same ch 3 space, *(ch 3, 3 TR in next ch 3 space)x7, ch 3, (3 TR, ch 3, 3 TR) in next ch 3 space* repeat x3, (ch 3, 3 TR in next ch 3 space)x7, ch 3, sl st to top of starting ch 3, sl st across 3 sts to end in the ch 3 space [each side 9 repeats of *3 TR, ch 3*; total 36 repeats or 108 TRs]
Row 9: Ch 3, 2 TR into ch 3 space, ch 3, 3 TR into same ch 3 space, *(ch 3, 3 TR in next ch 3 space)x8, ch 3, (3 TR, ch 3, 3 TR) in next ch 3 space* repeat x3, (ch 3, 3 TR in next ch 3 space)x8, ch 3, sl st to top of starting ch 3, sl st across 3 sts to end in the ch 3 space [each side 10 repeats of *3 TR, ch 3*; total 40 repeats or 120 TRs]
Row 10: Ch 3, 2 TR into ch 3 space, ch 3, 3 TR into same ch 3 space, *(ch 3, 3 TR in next ch 3 space)x9, ch 3, (3 TR, ch 3, 3 TR) in next ch 3 space* repeat x3, (ch 3, 3 TR in next ch 3 space)x9, ch 3, sl st to top of starting ch 3, sl st across 3 sts to end in the ch 3 space [each side 11 repeats of *3 TR, ch 3*; total 44 repeats or 132 TRs]
Row 11: Ch 3, 2 TR into ch 3 space, ch 3, 3 TR into same ch 3 space, *(ch 3, 3 TR in next ch 3 space)x10, ch 3, (3 TR, ch 3, 3 TR) in next ch 3 space* repeat x3, (ch 3, 3 TR in next ch 3 space)x10, ch 3, sl st to top of starting ch 3, sl st across 3 sts to end in the ch 3 space [each side 12 repeats of *3 TR, ch 3*; total 48 repeats or 144 TRs]
Row 12: Ch 3, 2 TR into ch 3 space, ch 3, 3 TR into same ch 3 space, *(ch 3, 3 TR in next ch 3 space)x11, ch 3, (3 TR, ch 3, 3 TR) in next ch 3 space* repeat x3, (ch 3, 3 TR in next ch 3 space)x11, ch 3, sl st to top of starting ch 3, sl st across 3 sts to end in the ch 3 space [each side 13 repeats of *3 TR, ch 3*; total 52 repeats or 156 TRs]
Row 13: Ch 3, 2 TR into ch 3 space, ch 3, 3 TR into same ch 3 space, *(ch 3, 3 TR in next ch 3 space)x12, ch 3, (3 TR, ch 3, 3 TR) in next ch 3 space* repeat x3, (ch 3, 3 TR in next ch 3 space)x12, ch 3, sl st to top of starting ch 3, sl st across 3 sts to end in the ch 3 space [each side 14 repeats of *3 TR, ch 3*; total 56 repeats or 168 TRs]
This is the end of the netting section (phew! It was getting boring towards the end, wasn’t it?)
You should now have a square of ~53-58 cm across. If your square is smaller, you can add extra rows until you get to ~55 cm.

You will now work back and forth along only one edge to gather it in. This creates the section between the straps – it’ll look like this once you’re finished the 1st gathered section:

If you need more hints on the gathered section and border/straps, check out the video tutorial:
Gathered Section 1:
Row 14: Sl st to the 2nd ch in the ch 3 gap, turn work, Ch1, SC in ch space, *SC in each of the 2nd and 3rd TRs, 2 SC in the CH 3 space* repeat to the last group of 3 TRs along the top edge, SC in the 2nd ch of the corner chain 3 (56 SC)


Row 15: Turn work, Ch 1, SC2tog x 28, (28 sts)

Row 16: Turn work, Ch 1, SC, *SC2tog, SC* repeat 9 times (19 sts)


Row 17: Turn work, ch1, SC in each st (19 SC)
Rows 18-19: Repeat row 17 x 2. Cut yarn and weave in end. (3 rows of 19 SC).
Your gathered section should look like this:

Gathered section 2:
Reattach the yarn at the opposite end of the bag and repeat rows 14-19. Your first row of SCs should be worked with the back side of the netting facing you.
***Do not cut yarn***

Your bag should look like this now. You will start to work down the long sides (as marked by the red arrows). The yellow arrow shows the starting point for the next row. The green sections are where you will form the handles of the bag.
Row 20 A: Ch1, SC into the side of each row of SC (6 SC).

20 B: When you get to the netting part: repeat *2 SC in the ch 3 space, SC in each of the 2nd and 3rd TRs* (58 SC).


20 C: For the gathered section at the other end, do one SC in each row (6 SC).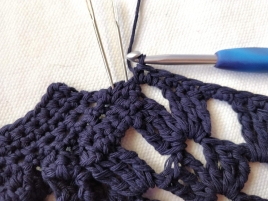
Now you will start to form the first handle using a foundation SC stitch (FSC). If you’ve never done FSC before, this is good tutorial video. NB I prefer the FSC compared to making a long chain and then working SC into it in the next round, since you already have the height of a SC after the first round. You can simply do a chain if you prefer, but you will then need to add an extra row of SC after row 22. NB – these straps are designed to be long enough to go over your shoulder, if you prefer to carry the bag in your hand, I’d recommend making shorter straps of 30-40 FSC.
20 D: Make 60 FSC stitches (approx 35-40 cm). On the 60th FSC: insert hook in base of previous st, yo and pull up a loop; insert hook into the top SC where you will join back to the bag, yo and pull loop through the SC and first loop on hook; yo and pull through both loops left on hook to complete the FSC.


20 E: continue working SC in the side of each row of SC on the gathered section (6 SC) and finish second side of bag and handle as for step B to D . Finish with a sl st to the first SC of row 20. (row 1 of border complete, 260 SC)
Row 21: Ch 1, SC in each of the first 6 sts (6 SC), on the netting part: alternate *SC, SC2tog* ending with a SC (39 sts), SC in each of the next 72 sts (gathered part and handle), on the netting again: *SC, SC2tog* ending with a SC (39 sts), SC in each of the next 66 sts (2nd gathered part and handle) join with sl st (row 2 of border 222 SC)
Row 22: Ch 1, SC in each st, join with sl st. cut yarn and sew in end. (row 3 of border 222 SC) [NB – if you used a chain instead of FSC to form the handles, do an extra row of SC here]

Just finished making this bag and it came out great. I’m very pleased with the results!
LikeLike
Glad to hear it Shirley. Thanks for stopping by to leave a comment 🙂
LikeLike